GREtap Tunnels for VLANs Across the Mesh
This guide explains how to extend VLANs across the WiFi mesh backhaul using GREtap tunnels.
Prerequisites
- WiFi mesh backhaul configured according to the previous guide
- Both routers must be able to communicate via the mesh interface
- Access to the LuCI interface on both routers
Why GREtap Instead of BATMAN-adv?
For a mesh network consisting of only two routers, GREtap is preferable to BATMAN-adv for several reasons:
Advantages of GREtap in This Scenario
-
Point-to-Point Sufficient: With two routers, a simple point-to-point tunnel is sufficient. BATMAN-adv is designed for complex mesh topologies with many nodes and redundant paths.
-
Less Overhead: GREtap has lower protocol overhead than BATMAN-adv. With only two nodes, the advanced mesh routing features of BATMAN are not necessary.
-
Configuration Simplicity: GREtap is simpler to configure and debug. No need to manage mesh routing tables, path metrics, or route selection algorithms.
-
Predictability: Traffic always takes the same path (the direct tunnel). No dynamic route changes.
-
Native Support: GREtap is widely supported and documented in OpenWRT without requiring complex additional kernel modules.
BATMAN-adv becomes interesting when you have:
- 3 or more mesh nodes
- Multiple possible paths between nodes
- Need for redundancy and automatic failover
- Dynamic mesh topology with mobile nodes
Installing Required Packages
Install the necessary package on both routers:
opkg update
opkg install luci-proto-gre
Or via the LuCI interface: System → Software, search for and install luci-proto-gre.
Configuring the GREtap Tunnel
Step 1: Create the GREtap Interface
On both routers, create a new GREtap interface:
- Go to Network → Interfaces → Add new interface
- Configure the basic parameters
Basic Parameters:
- Name: short name (example:
gr) - Protocol: GRETAP (Ethernet over GRE)
OpenWRT automatically creates the interface with the gretap- prefix. For example, if you name your interface trunk, OpenWRT will create gretap-trunk.
Problem: To pass VLANs, the notation will be gretap-trunk.100, which is 16 characters and exceeds the limit!
Problematic Example:
- Interface named
trunk→ Device created:gretap-trunk(13 characters) - VLAN 100 →
gretap-trunk.100(16 characters) ❌ TOO LONG
Solution: Use a very short name like gr, t, or g.
- Interface named
gr→ Device created:gretap-gr(9 characters) - VLAN 100 →
gretap-gr.100(13 characters) ✅ OK
Network interface names under Linux are stored in a structure that uses a 16-byte array. This array includes the null terminator \0, so the maximum length of a network interface name is 15 characters (16 - 1 = 15).
Tunnel Parameters (General Settings):
- Remote IPv4 address or FQDN: IP of the other router on the mesh interface
- Local IPv4 address: IP of this router on the mesh interface
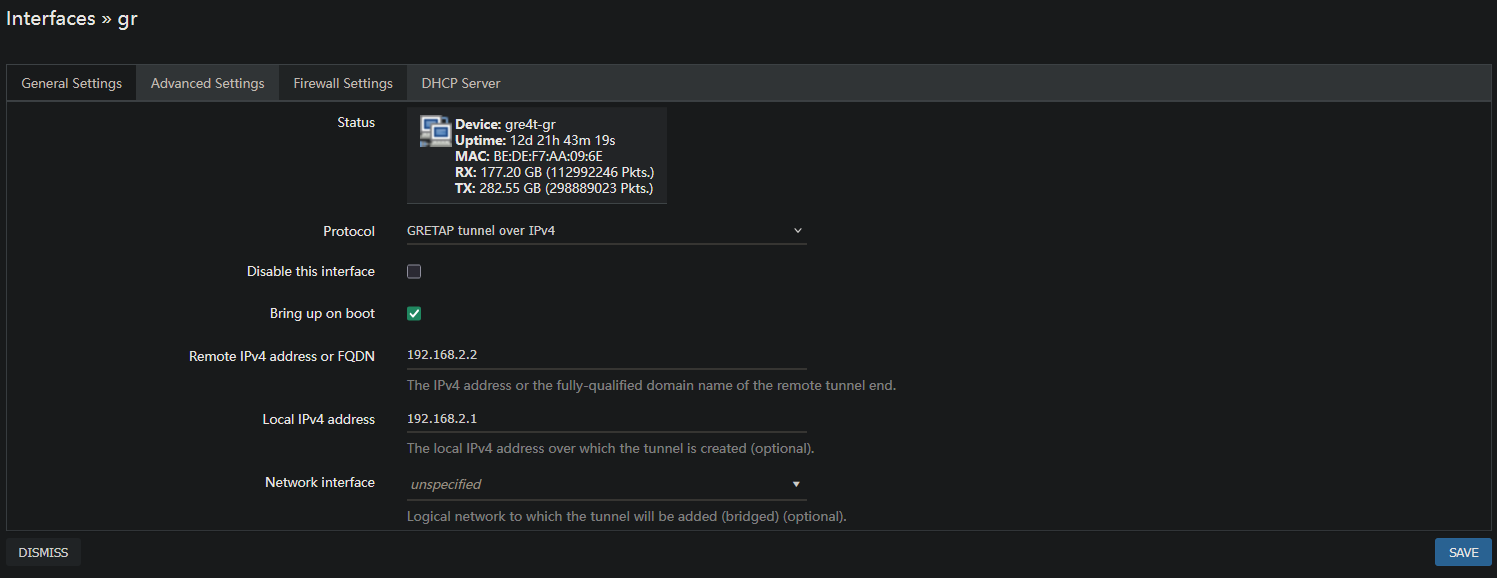
Advanced Options (Advanced Settings):
It is important to configure the advanced options correctly:
- ⬜ Use TTL on tunnel interface: leave unchecked
- ⬜ Use PMTU discovery: leave unchecked (equivalent to Don't fragment)
- ⬜ Default gateway: UNCHECK this option (important!)
- Bind interface: select the mesh interface (for example
lan)

- PMTU discovery / Don't fragment: WiFi mesh traffic may require fragmentation. Allowing fragmentation avoids packet loss.
- Default gateway: The GREtap tunnel should not become the router's default gateway.
Extending VLANs Through the Tunnel
Principle
To pass a VLAN through the GREtap tunnel, you need to create a bridge device that contains:
- The local physical port or VLAN interface
- The corresponding GREtap VLAN port
The notation used for a GREtap VLAN port is: @<gretap_device_name>.<vlan_number>
Example: For VLAN 100 with a tunnel named gr (device: gretap-gr) → @gretap-gr.100
Configuration on the Main Router
Step 1: Create the Bridge Device for the VLAN
- Go to Network → Interfaces → Devices → Add device configuration
- Create a Bridge device:
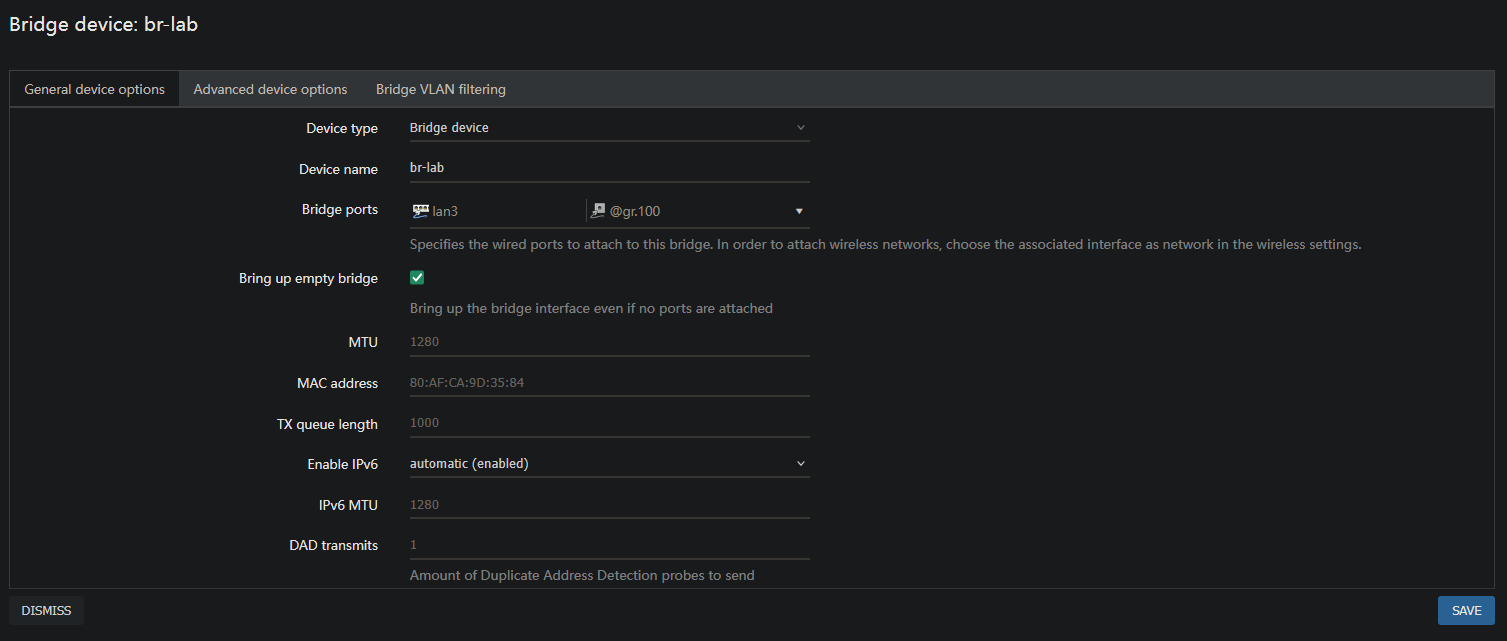
Bridge Configuration:
- Device type: Bridge device
- Device name:
br-lab(or descriptive name for your VLAN) - Bridge ports: Add the following ports:
- The local physical port or VLAN (example:
lan3for a physical port) - The GREtap VLAN port:
@gretap-gr.100(adapt according to your device and VLAN number)
- The local physical port or VLAN (example:
Step 2: Create the Network Interface for the VLAN
- Network → Interfaces → Add new interface
- Configure the interface:
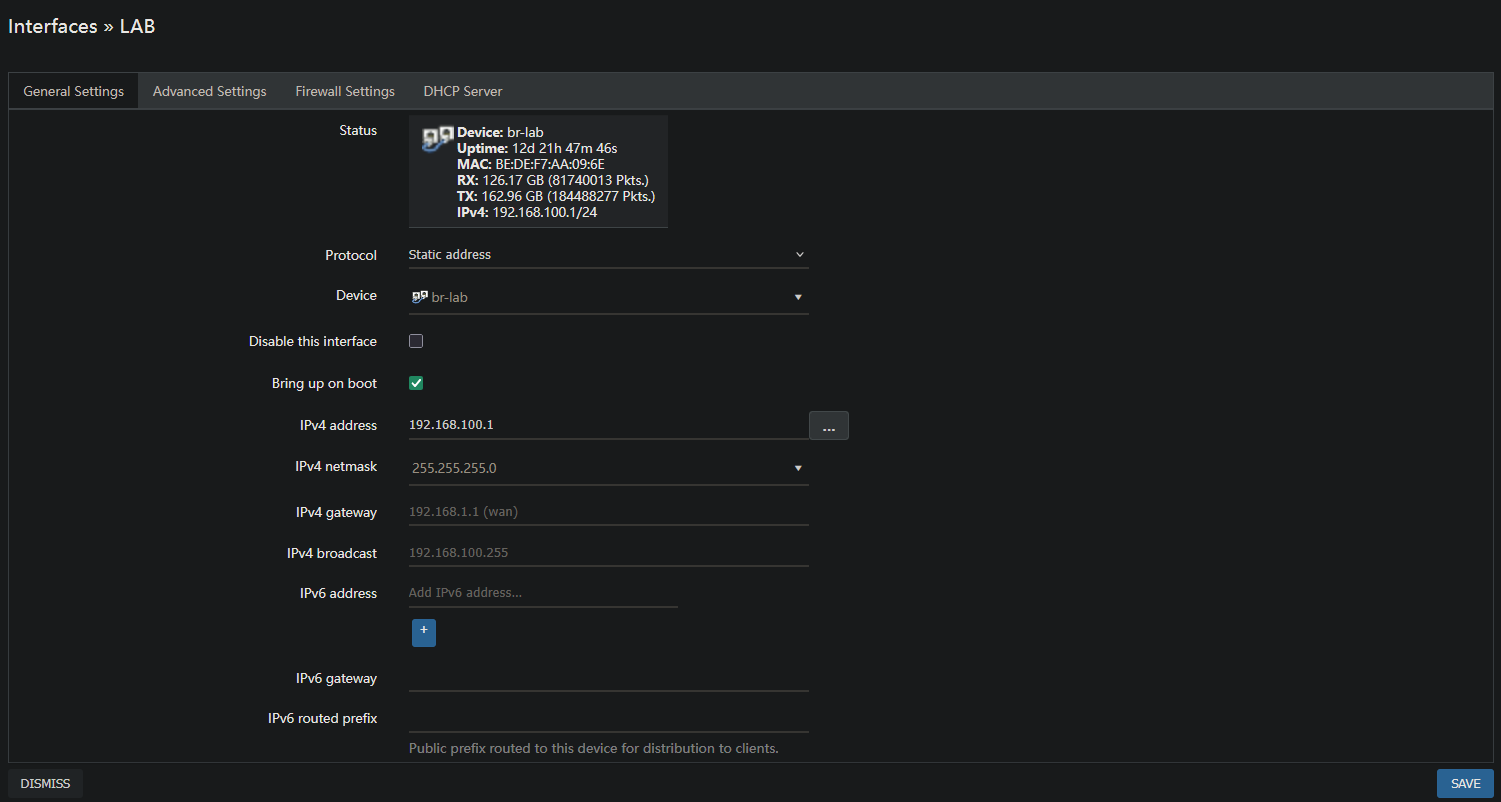
Parameters (General Settings):
- Name:
LAB(or descriptive name) - Protocol: Static address
- Device: Select the previously created bridge (
br-lab) - IPv4 address: This router's IP address on the VLAN (example:
192.168.100.1) - IPv4 netmask: The VLAN's netmask (example:
255.255.255.0)
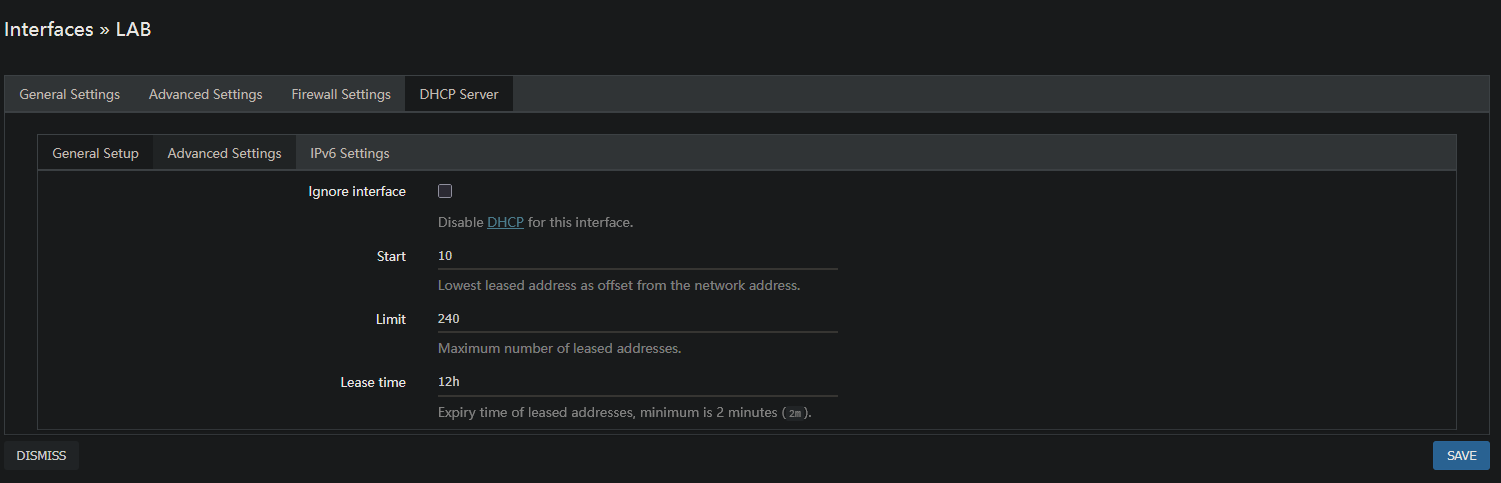
DHCP Server (DHCP Server):
Configure the DHCP server for this VLAN to distribute IPs to clients:
Firewall Settings:
Assign the interface to an appropriate firewall zone (example: homelab_zone or create a new zone):

Once the Dumb AP retrieves an IP via DHCP on this VLAN, you can configure a static DHCP lease to assign it a fixed IP.
Example: set the Dumb AP to IP .2 on each VLAN for consistent configuration (example: 192.168.100.2).
Repeat this configuration for each VLAN to extend through the tunnel.
Configuration on the Dumb AP
On the second router (Dumb AP), the VLAN interfaces must be configured as DHCP clients to automatically retrieve an IP on each VLAN.
- Network → Interfaces → Add new interface
- Configure the interface:
- Name:
vlan100(or descriptive name) - Protocol: DHCP client
- Device:
@gretap-gr.100(the GREtap VLAN port)
- Name:
The Dumb AP will automatically retrieve an IP address from the main router's DHCP server on this VLAN.
Multi-VLAN Configuration Example
Typical Configuration:
- VLAN 10 (Management) →
@gretap-gr.10 - VLAN 100 (Homelab) →
@gretap-gr.100 - VLAN 200 (IoT) →
@gretap-gr.200
Each VLAN crosses the GREtap tunnel transparently and in isolation.
Verification and Testing
Connectivity Tests
From the Dumb AP, test connectivity on each VLAN:
# Ping to VLAN 100 gateway
ping -I vlan100 192.168.100.1

# Verify obtaining an IP via DHCP
ip addr show dev gretap-gr.100
From the main router, verify that the Dumb AP appears in the DHCP leases:
- Network → Interfaces → LAB → DHCP Server → Active DHCP Leases
Conclusion
With GREtap, you can effectively extend your VLANs across a WiFi mesh backhaul between two OpenWRT routers. This solution offers a good compromise between simplicity, performance, and functionality for point-to-point topologies.
For more complex mesh networks with 3 or more nodes, consider using BATMAN-adv which offers more advanced mesh routing features.